Table of Contents
FunTracker.Site Users Manual
For Advanced Users only:
Map Page:
https://www.funtracker.site/map.html
The Map mode page seen at: https://www.funtracker.site/map.html is first a detailed street map of the world, that is zooomable and pannable on your phone with brushes of your finger to pan, and pinch to zoom, much the same as google maps. It is also a dynamically changing real-time Map containing Icons of targets that members have added indicating coordinate lat long positions of interest at the time they added them. There are over 41 different icons and growing, ranging from Beer party markers, camera icons marking picture positions and other events and activities. The icons can be clicked on to bring up a popup that provides some details of who set it (ID number in most cases) and when it was triggered with added optional text info that can be provided by users from entries they setup in configs. At the bottom of the popup is the Type: of icon that is to be used for filters as seen later. The added static Icons placed by members are indicated as green outlined icons. Red outlined Icons indicate That the target is a moving tracked target that move in real-time as the target tracked data lat long moves. A trailing blue line on the map indicates a track of the presently selected focus target over the last 2 hours (defaults to target scotty).
This screen shot (now outdated) shows the map with the Scotty's Icon on it at his apartment.

Also note the camera icons on the Map that indicating Scotty also shared some photo at those locations. if you click on a photo you can also click the link in it to view the picture in the funtracker.site Gallery. Also note that black white square at the top left corner. You can hit that to toggle funtracker.site map into and out of Full Screen Mode.
The blue line on the Map indicate the track path generated by who every you have set up in configs to track. by config default it tracks Scotty's path over the last 2 hours to provide you an example.
New feature as option the Map page will send your present GPS position to the server database at settable interval that defaults to every 60 seconds. This can be disabled in configs by setting Enable Coords Send to 0.
New feature, the Proximity Alarm mode if set active will function if this page is operational on the device or phone.
How to Submit Pictures with FunTracker.Site Camera:
https://www.funtracker.site/shoot/index.html
Simply select the Shoot Pictures Mode button from the top of the Map or drop down Menu from the top of the other pages, to bring up the camera. You will see a box open asking for permission to use the camera mode from within your browser. You must select the camera device from the popup box to allow the camera to work. You can also go direct to the camera page from the link here: https://www.funtracker.site/shoot/index.html. Hit the Big Red button will freeze a picture. If you don't like the image you captured you can hit the arrow button to try take another shot before you send it. Then just hit the email button and the picture is instantly sent to the funtracker.site gallery (upload time average is about 3 seconds for me with Cat 3G Internet service on my Imobile phone). That simple. No login or info needed.


How to view pictures taken with the Camera:
https://www.funtracker.site/shoot/gallery.php
Simply select the Gallery Button on top of Map or from the drop down Menu selection on other pages or go direct to the Gallery link here: https://www.funtracker.site/shoot/gallery.php, and the most recent pictures taken by users with the tricktraker Camera will be displayed in a matrix format including the pics you have submited. Be careful since everyone in the world can now see these pictures. But feel free to put anything you want on it, I don't care. Bellow the pictures you will see some details of where the images were captured and when. If you click on the image you will be taken to the Wiki page of that image if it exists. We now also have a Search Box at the top that if submitted will search for a match of user ID, info, type number or pic_file that is the images filename to match in the picture database to filter pictures to only what you are looking for. The other option is click on the camera icon in the Map that is at the location that you took the picture.

How to add static Marker Icons to Map:
https://www.funtracker.site/send.html
Select Send Cords from the drop down Menu or from the Maps Send Cords button, or go directly to the link here: https://www.funtracker.site/send.html. You will see a popup asking for permission to access your browsers GPS features, select allow. Now just hit any of the Icon buttons with the desired icon picture you want. The Icon will then be visible on the https://www.funtracker.site/map.html Map at the GPS position that you recorded it at and remain there after you leave. A popup if the icon on the map is clicked provides details of when the target icon was created, by who and other details. This is intended to make quick note to everyone that you saw something of interest at that time at that location and didn't have time to setup and take a picture of it or it may have been too dark to see with a camera. These icons are only displayed for a time and then fall off the map by the default Track Trail time window of 2 hours, or what have set in your customized configs. So by default only targets marked within two hours are seen on the map after sent. The very first update of the funtracker.site map when it is loaded may show some older targets and then they fall off after the first update poll data over writes them. This gives you a quick look of what might be seen if you widen your Track Trail time window settings.

How to Delete an Event from Map
If for example a beer party ends or is canceled that was already added as a static event as explained above, You (or anyone) can delete it from the Event Table by going to: https://www.funtracker.site/table/index.php. finding your event in the table if it isn't on top then you can search for it by type number or as the id that added it. Then just hit the Delete button on that line in the table, confirm the delete and your done.


How to set Proximity Alarm
https://www.funtracker.site/config.html
Modify config setting for Alarm Radius Default: 0 (disabled) and config values of Ref Lat, Lon. You can now setup an audio alarm that will trigger (sound siren alarm) when a proximity event happens on the network. There are two different modes. Mode 1: (positive Alarm Radius setting in config) that trigger on the event of target (track_id) gets more than Alarm Radius distance (in meters) from the Ref Lat, Lon position. Mode 2: (negitive Alarm Radius settings in config) That trigger on the event of target (track_id) getting within the absolute value Alarm Radius distance (in meters) setting from the Ref Lat, Lon position. The Ref Lat, Lon position is determined from the values in config settings of Ref Lat, Ref Lon. if Ref Lat is set to 0 then the Ref Lat, Lon position used in distance calculation is from the last known GPS Lat, Lon of the device in hand (the phone). If Ref Lat is any value other than 0 then the distance calculation will be from the Ref Lat, Lon config set GPS position.
How to Change your Moving User Icon on the Map
https://www.funtracker.site/change_icon.html
Change User Icon Page allows you to change what your Tracked moving icon looks like on the Map. The default is type: 12 that is the “I Am Here” Icon. But you can change this to be a “Biker” Icon or “Hiker” Icon or any of the many other activity marker Icons to indicated you are biking or doing some other activity and you are inviting others to join you. At the time this was published we had 43 different activity icons to choose from. As time goes on we will be adding new tracker icons of other activities. There is also a path to Change User Icon page from the Map and from Config pages drop down menu. Note: Moving Tracked Icons are seen as red on the Map and Static Icons are the green ones.
![]()
How to Change your Moving User Icon to a custom uploaded image
Upload an Image that will become your Custom User Icon as seen by everyone from the Map when you are active on the Map page. The image can be of any pixel size but must be less than 200kb file size to reduce load on server bandwidth. We accept jpg and png file format. Click on the link bellow to open page to upload your image file to funtracker.site.
Real Time Chat:
https://www.funtracker.site/chat.html
funtracker.site has Three methods of chat including primitive IRC text chat that defaults to #tricktraker IRC group chat. You can also double click on someone in the group and start a private chat with them if they allow you to. We also have two expermental Audio/Video group chat modes that allows up to 6 people on each to join at the same time in a group talk with video conference mode.
Audio/Video conference mode:

Kiwi IRC text Chat mode:


Track Event Table:
https://www.funtracker.site/table/index.php
This page displays a Table of tracker events normally generated by Traccar that sends data to funtracker.site or from Send Cords positions. There is a search box at the top that allows you to search through tracks data for id or type. Events also include positions sent from Send Trick Cords so you can search for types of interest for example type=2 for all sexy girl markers. The table is also sortable by any column by clicking on the top of the table column you would like to sort by. Note at this time you can only branch to this page from config menu or you can go direct to the page here: https://www.funtracker.site/table/index.php . Note also as an experiment we have added our calculation of how far you walk and how many calories you have burned over the window of time set in your Track Trail Time value in configs (default: 120 minutes or two hours). At this time we only pull max 200 points from the database so max time would be about a 3 hour window at this time.

Picture Event Table:
https://www.funtracker.site/table/pic_table.php
This page displays a table of all images taken by all users with the funtracker.site Camera. The search box on the top allows you to search through all pictures taken by you or any other users. Search looks in picture table for match in id, type or pic_file name. The table also includes a link to each of the images that if clicked will take you to the Gallery page to display the image of interest and another link that will take you to the map to show you what location the images was taken. At this time you can only get to this page from the config Menu or you can go direct to the page here: https://www.funtracker.site/table/pic_table.php

Walk Mileage Monitor (expermental):
https://www.funtracker.site/table/walker.html
The Walk Mileage Monitor tracks the number of miles you truly walked. It also displays the number of calories you burned in that period of time. You can reset the values accumulated by hitting the reset button at the bottom of the page (scroll to bottom). Mileage and totals are only accumulated if you are traveling at less that 5mph and more than 1.0mph that is considered within walking speed. All other movements if you get in your car or other transportation is not added. Note: The new version of Walker Mileage Monitor also can act as a tracker beacon from any mobile device when the Enable Coords Send: config is set to “1” (default is active). In reality the Mileage Monitor can also monitor a bicycle or car trip if you modify the max speed limits measured in configs see https://www.funtracker.site/wiki/doku.php?id=tricktraker.com:users_manual#max_speed_record

Funtracker.Site Configs:
https://www.funtracker.site/config.html
Note: you MUST hit SUBMIT at the bottom of config page for configs to become active.
Top section of configs

Bottom section of configs, make sure you pan to see all the configs available.

Map Center Lat and Lon:
Default: lat=12.9304767 lon=100.8798213 (Scotty's apartment building in Pattaya Central) The Map Center Lat, Lon is the latitude Longitude position of where the center of the map will be when you start up the funtracker.site in Map mode. This defaults to the Center of Pattaya Thailand that is were tricktraker software and funtracker.site are being developed.
Map Zoom Factor:
Default: 15 (max is 18) The Map Zoom factor is the default zoom window that the Funtracker.site Map will come up in when you start it.
Your User ID:
Default: random number 6 digits long generated at first entry to the site or when you reset defaults. There is no sign up or login on funtracker.site, only this auto generated number is used as a method to provide some individuality among users. This number can be randomized again at any time by hitting the “Reset To Default” button at the bottom of the config page. That will generate a new random TT ID number for the user that will be used in all tracker transactions in the future.
Your Passkey:
Default: random leter-number 6 long generated at first entry to the site. There is no sign up or login on funtracker.site, only this auto generated passkey is used to secure you account from others making changes to your cord data stream. If you move to another device and want to use the same User ID, Passkey set, then you will have to move both these values into the configs of the new device.
Filter types:
Default: Blank (no filters) Filter types is used to put only the marker icons of what you are interested in, on your Map. For example if you just wanted to know where Scotty is (type = 1) you would enter “1” in the Filter types config. To view more than one type of marker icon you can put commas between type numbers to view as many types as you want. Example “1,17” would display “Scotty's icon” and all the active “Bicycler icons” in all there locations that they may be found on the Map. To find out what an icon type number is you can click on any icon on the map. in the popup text at the bottom you will see it documented as type: 1 or what ever it might be. Then go to configs enter the type numbers at Filter types and don't forget to hit the “Submit” button at the bottom of the config to activate it. You can also view all the types of icons and what there number is from the Change Icon Page https://www.funtracker.site/change_icon.html.
Filter Radius:
Default: 15000 (in meter) Filter Radius is the max distance as measured in Meters from the Center of the map to display target icons and pictures in the Gallery. Example if set to 1000 it will only show you were sexy girls are that are less than 1000 Meters away or 1km. To find distance from your present location you can Set Map Center to GPS Position in config with the button at the bottom of config. This works on android but On a PC computer this may not be accurate so you may in that case have to modify the map center manually in configs at the top Map Center lat lon settings then hit submit at the bottom.
Track ID:
Default: 206648 (this is Scotty's TT ID number so you will default to see scotty's tracks) This is used if you want to pick out a certain member and find out the path that they have been taking. Users only generate track data on the tricktraker database if they are running there phone the Map page or the Walk Mileage Monitor Page open on there phone, or if they have traccar installed and running on there mobile device. You will note that this TT ID defaults to my (scotty's) track ID so you can find me any time at the beach of Pattaya where I am known to hang out and party. At the end of a track you will see a target Icon indicating the present position of the Track ID target position. If you leave Track ID blank, the track target mode will be disabled with no tracks shown on the map.
Track Trail Time:
Default: 120 (in minutes) The Track Trail Time is how long in time any aged track info on the Map remains on the display. Example the blue track line for ID above is fallowed back in time to watch a trail that someone leaves behind by default for 2 hours. This also controls static marked icons and mobile tracked icons last updated age limits before dropped. and the settings is also used in the Gallery Search filter when used to find pictures taken within a certain time window.
Map Update Interval:
Default: 5 (in seconds) This is the time interval of how often the Icons and trails on the tricktraker Map page are updated. The limit is no faster than every 2 seconds ( we could go faster but we don't have fast servers to handle it yet). Also faster update puts more power drain on your android phone that is monitoring it and requires more data bandwidth usage (not much) to handle more data flow for target info updates.
Link Icon type number (0 - 43):
Default: 0
This is the type of icon that will be seen in map links you send to others (and maybe other modes may use this). it defaults to 0 as just a standard user (here I am) icon on the map for sent links. A few other icon images examples seen bellow can also be used:

Link added popup info:
Default: blank (no added info) This is the added info on a popup when the map icon is clicked that is used when Send Cords icon is sent, or links you send to friends so they can click your icon and will see text of any notes you wanted to add to your icon or picture you send. The value is retained and will require changing if you send another icon or picture it will send the last popup info text you added in the past.
Track Server URL:
Default: https://www.funtracker.site/record_track.php The URL used for when you are sending cords of targets to funtracker.site. Most the time you will leave this as default. In the future we might have technical problems with the original site server, so we have it so we can change the address at any time or you can point it to a private server for info if you or your group sets one up. This is the site that the target info is sent to be recorded in the database.
Track Get Server URL:
Default: https://www.funtracker.site/get_track.php This is the API server that is used to get updated icon and track information from. Normally you will just leave this as default (or reset to default if we change it). This is the server that is used to recover target info from the database.
IRC Server:
Default: wilhelm.freenode.net This is the server used in the IRC chat channel. these at times may need to change. These changes will normaly be done on our side that may require you to do a default reset to change this. In some cases you may want to setup a private IRC net for more tecno or private people.
Camera Resolution:
Default: low This at present has two settings of “low” that sets the camera mode to take 640 pixel by 480 pixel photos by default or you can set it to “high” mode to send 1280 px by 720 px images to funtracker.site when you hit the email button in the camera mode. This may depend on the camera specs in your phone to work. You might try high and verify your Internet bandwidth can also handle sending the bigger files size of higher resolution images before making any changes permanent.
Enable Coords Send:
Default: 1 if Enable Cords is set to “1” then you will be sending your GPS coordinate positions to funtracker.site at a rate of Send Coords Interval, on supported funtracker.site pages. If you wish to disable sending coordinates then set this value to “0” or any other value. At the time of writing this, only the Map page and Walk Mileage Monitor Page supports auto Coords Send mode with effected rates. This does not change the rate of what you may have Traccar software sent data set to. Traccar software is a completely independent software system.
Send Coords Interval:
Default: 60 (seconds) This is the time interval that coordinates lat long are sent to tricktraker server from supported tricktraker pages. At the time of writing this, only Walk Mileage Monitor Page supports Coords Send mode.
Min Speed Record
Default: 1 (mph) This is the minimum speed that is recorded as distance or time in the Walker Mileage Monitor page. if your not walking at more the 1 mph by default your not considered as walking. This can be changed if you want to use Walker Mileage Monitor to measure some other activity like a bicycle ride you might change this to min speed of 5 mph.
Max Speed Record
Default: 6 (mph) This is the maximum speed that is recorded as distance or time in the Walker Mileage Monitor page. if your moving faster than 6 mph (default) then you must be in a car or other means of transport so it's not counted as walking. if you wanted to monitor some other activity this speed can be changed. example for a bicycle ride max speed might be up to 40 mph so you might try that value for a bike ride. if monitoring a car trip you might set this to 130 mph.
Icon Scale value
Default: 1 (multiplyer) This Icon Scale value changes the size of all icons that appear on the Map. Example if you set Icon Scale to 0.5 then the size of icons will become 1/2 as big. If you set this to 2.0 then icons will get 2X as big. On a android phone you might want to set this to 2.0 or bigger depending on the size of you devices screen and dot pitch and your personal preferences.
Alarm Radius value
Default: 0 (in meters, 0 disable alarm) This sets the Alarm active to trigger audio alert when set to a value <> 0. Mode 1: mode 1 is in effect when Alarm Radius is set to a positive number. in mode 1 the alarm is triggered when the distance from ref lat, lon GPS coordinate is greater than Alarm Radius value. Mode 2: mode 2 is in effect when Alarm Radius value is negitive. in mode 2 the alarm is triggered when the distance from the ref lat,lon GPS coordinate is less than Alarm Radius value. What is used for the Ref Lat lon position is dependent on the settings of Alarm Ref Lat, Alarm Ref long settings.
Alarm Ref Lat, Alarm Ref Lon
Default: 0 (in degrees) When Alarm Ref Lat is set to 0, the Ref Lat, lon values used in distance calculation for alarm trigger will be from the last known lat, long position of the GPS device or phone. When Ref lat is any value other than 0 then the values of Alarm Ref Lat and Alarm Ref lon will be used as the values for Alarm Ref lat, lon GPS location.
Disable Send Coords Radius
Default: 0 (in meters) When set to 0 this feature is disabled, When set to a value in meters + Positive will disable the auto coordinate update when you Exit the Radius distance with reference to distance from lat, long of values in Disable Send Coords Reference Lat, and Disable Send Coords Reference Long. When this value is - Negitive, then auto coordinate update will be disable when you Enter the Radius with same ref lat, long above. Note this only disables auto sending Coordinates from the https://www.funtracker.site/map.html page, This has no effect on Traccar software if you are running that in the background of this device. This allows you to automatically prevent sending your coordinates at a location you want to keep private, or only send your coordinates when you arrive at a location where you want to be seen.
Disable Send Coords Reference Lat, Long
default: 0 (in degrees) These two values are used as the reference coordinate Lat, Long point used in Disable Send Coords Radius above.
Map Center Mode
default: 1 (modes from 0 - 2) with mode 0, the map center will default to come up in the location that is set in map center lat lon config settings that default to pattaya (scotty's appartment). In Map Center Mode 1 (dafault), when the map is run it will center at what the present position of the device being held (only first measured position of session). in Map Center Mode 2, The map center will track (updated every time map icons are updated) to the present position of the device (phone, computer) being held from GPS or other methods available to this device.
Submit Change button:
The data you change in the configs above do not change until you hit the submit button. Make sure you click this after you make any changes to the configs.
Set Map Center to GPS position button:
This takes a GPS reading from your phone and sets your default map center to this position when you bring up the Map mode next time. This position is also used in several other parts of the funtracker.site modes.
Reset to Default Configs button:
This will reset all the values in configs to the factory default values. This will also auto generate a new Random 6 digit ID number for your account. So if you want to keep your original ID number make sure you note it before you do a reset so you can change it back to your original ID value. This is an important feature as we are making many changes at this stage of development and we may make changes that require you to do a reset of defaults as we are adding new things to the configs all the time now. Also over time we may need to move servers or who knows what. when you have a problem with funtracker.site pages, it might be a good idea to do a reload page on you browser, then hit this reset button and then another reload to see if it fixes anything. if not contact us to see what we can do to fix it.
Map Link:
This is a URL that you can send to someone to indicate to them were you are or a point of interest you want them to know about. To use this at your present location you should Set Map Center to GPS then copy and paste this to a friend in an email or skype, Line or other method. when they click on this link it will take them to funtracker.site map with your icon at your location of interest and if the icon on the map is clicked, a popup with the info you added (optionally) above in link details will also be displayed.
Change Default browser in android to Firefox:
You may find that the default browser in android may not perform all the features of funtracker.site including not sending GPS coordinates due to it's lack of support for reading GPS data from your phone. It will still work for you to see where other people are located on the Map and you can still use Traccar https://play.google.com/store/apps/details?id=org.traccar.client&hl=en to perform the GPS updates instead of your browser if you prefer not to install Firefox. But if you want to play with all the features including GPS, Camera, Audio, Video features of funtracker.site from your browser, you will need to install a more advanced browser into your phone like Firefox (most recommended) https://play.google.com/store/apps/details?id=org.mozilla.firefox&hl=en or Chrome. After you install your new browser you might also want to change the default browser app (if needed) to point to your more advanced browser by default from other apps, see: https://support.mozilla.org/en-US/kb/make-firefox-default-browser-android for details. Changing the default browser will make links you hit in Skype, Email, Line or other apps open in Firefox instead of the original light browser that came with the phone.
Traccar tracking software support:
funtracker.site API interface is based on the Traccar software format. You can optionally install Traccar from the android playstore to auto send updated locations to funtracker.site of your changing location over time at any user defined rate interval (recommend not any faster than 60 sec interval). Traccar (on android) also has a hidden mode version that you can install in a girls or other persons phone that you want to track without there knowledge to find out where they are and were they have been over any period of time without them even knowing it's installed. See https://www.traccar.org/ for more details and or just install it from Google playstore at https://play.google.com/store/apps/details?id=org.traccar.client. Also for Apple Iphone 7.0 and up see https://itunes.apple.com/us/app/traccar-client/id843156974?mt=8 . To setup traccar on funtracker.site, you will have to change the default server address to api.funtracker.site (note has changed) and the port address to port 80 . Also be sure to set your traccar ID to be the same number used in funtracker.site or you will have two of you on the map at the same time with different ID's when you update an event. It's also a good idea if your running Traccar to disable auto coord send in the funtracker.site configs since it won't be needed with traccar updating coords in the background already.
Note: Traccar should auto start tracking on powerup boot of your android phone, if you have start set in Traccar configs. If it fails to auto start it might be due to badly installed SuperSu. After I reinstalled SuperSu Traccar auto boots ok now.
Screen shots of what Traccar setup looks like on android:


Test apk regular traccar install file with preset server values: https://www.funtracker.site/api/traccar/app-regular-debug.apk
Test apk hidden traccar file with preset server values: https://www.funtracker.site/api/traccar/app-hidden-debug.apk
Note: to uninstall traccar hidden version the name is “Device Settings”, remove like any other app just look for this name to remove instead of traccar.
Note: This is what I use to track my location and track path on the funtracker.site as user ID: 206648 with the type: 41 custom icon with my picture in it.
So use my tracks as an example of what you would see if you setup traccar with your phone. Also note that they also have an Apple Iphone version of Traccar and there are other inexpensive and small hardware devices on the market that support this API protocol.
Learned about traccar: Found that if I'm in the network provider only location mode (center selection) with wifi off, it will only update location 1 time and stop. turning on wifi (and restart?) makes it work normally, not sure why. so in general if your not using GPS best keep wifi on.
How to Track a device in real-time without installing Traccar software
All you have to do is tell your friend to open this link: https://www.funtracker.site/table/walker.html on his android phone. After he opens this link he can then turn off his screen, the browser with the tracker will continue to run in the background of his phone. You can then goto this page https://www.funtracker.site/table/index.php look at the top of the list to find recent track updates. When you think you find him on the list you can click on the link on that line to open the map that marks his present location. If you want to continue to track him with real-time updates you can change your config setting for Track ID to his tricktraker 6 digit ID seen in the table list above. After you change the Track ID and press submit on config page you can goto the Map page to view your friends movements and tracks of where he has been since he started the tracker mode.
Note the Default browser in some android phones may not support GPS read
We have now found that the default browser in at least some android phones don't support GPS read function so this feature won't work for them. In this case you will need to install the Firefox browser https://play.google.com/store/apps/details?id=org.mozilla.firefox&hl=en or other to have this feature.
Update: The built in tracking send is also now incorporated into the Map page https://www.funtracker.site/map.html so when you are on the Map page you also send a beacon of your coordinated location every 60 seconds (by default) that can be disabled in configs.
How to Create Custom Wiki on Gallery images:
Each Gallery image is a link to the wiki page. if the wiki page exists, clicking on the image in the Gallery will open the wiki on that image. If the wiki for this image doesn't exist yet the wiki will ask you to build one. If you have any info on that image you are free to make the wiki page at that time. See https://www.dokuwiki.org/manual for details on how to create and edit wiki and features of dukowiki for more detailed instructions on how to continue. Example of a Gallery wiki page: http://wiki.funtracker.site/doku.php?id=tricktraker.com:gallery:webcam1461212620.jpg

Example of what is seen when no wiki yet exist for an image:

QRcode to Share funtracker.site with others
These QRcode images can be used to share the funtracker.site links with other people that have QRcode support already installed on there android or other phones. If you or others don't already have QR-code support installed on your android phone you can install it free from the googleplay store:https://play.google.com/store/apps/details?id=me.scan.android.client&hl=en

https://www.funtracker.site/table/walker.html

https://www.funtracker.site/map.html

http://map.activegrouptracker.com
http://users.activegrouptracker.com
This is just forwarded to funtracker.site but seems some software doesn't support .site as a default URL link for example Skype.com. so use this in that case. We have now found that only Linux Skype has this problem with .site not being seen as links so this won't be needed in most cases.

QR Code Decoder
It seems no one I know even installs QR Coder reader decoders, so I went ahead and wrote one that can be used to read a shared URL link with someone on the reader side, without any required software install. It should work with most any URL. It's primitive and expermental. To start hit link bellow and accept popup asking to use the camera. When the camera image comes up on the screen, put a QR Code into the view of the camera. if it detects a QR-code it will make a camera click sound and a URL link will appear above the camera image. you can then click this link to go to the shared website.
Configuration Preset links
To make it simple to update the complete set of default Config settings with just a click on a link, for new versions of software and system changes and other, we have created several links to do this for you. These links can be sent to someone with Skype or other to allow them to just click to to make desired changes with there installed set.
Preset 1.0 (version 1.0)
Preset 1.0 does a complete factory reset of all values in default configs accept the ID: number if one already exists. This will update all values to the latest factory default settings of version 1.0.
Preset 2.0 (version 1.0)
Preset 2.0 resets all configs same as above accept the Icon Scale value is set to 2.0 (defaults 1.0) that makes it easier to see icons on the small screen of a phone.
Preset 3.0 (version 1.0)
Preset 3.0 only changes the value of Track Trail Time to 1440 minutes (24 hours) so that you see all the activities that have happened around you on the Map within the last 24 hours or 1 day (default value is 120 minutes that sees back 2 hours). Some people prefer seeing more in the past (not me) so to make it simple to change I created this preset. Also added radius_filter distance to 15000 meter (original distance 4000 was to small). All other values in config stay the same.
Preset 4.0 (version 1.0)
Preset 4.0 only changes the Tracker Server URL and Tracker Get Server URL's to http://b.funtracker.site that is a test mirror site running on a digitalocean.com server with a completely different mysql database. we may later transition all to this site if it works out. Note older data is mirrored on this site but new updated data to this API will NOT mirror to original https://www.funtracker.site. so your coordinates sent to this site will only be seen on “b”.
This link will point you to API on “b” site when using site “a” (original site):
https://www.funtracker.site/config_set_4_0.html
This will point you to API on “b” site when using site “b” (new test site):
Preset 5.0 (version 1.0)
Preset 5.0 only changes the Tracker Server URL and Tracker Get Server URL's used on chosen site to point at API “a”. this allows you to switch ether server back to the original “a” site API server in the event you changed API pointing to b.funtracker.site in above link and want to change it back again to the original “a” site.
This will point API to site “a” when using site “a” (original site default):
https://www.funtracker.site/config_set_5_0.html
This will point API to site “a” when using site “b” (new test site):
Android Rocket.chat app setup for chat.funtracker.site support
Optionally you can install the android app Rocket.chat that integrates to our new chat.funtracker.site. To start, install the app from google play store at: https://play.google.com/store/apps/details?id=com.konecty.rocket.chat&hl=en or on android google play search for Rocket.Chat. After installed you will need to start the app to configure it. at first run of Rocket.Chat you should see this:
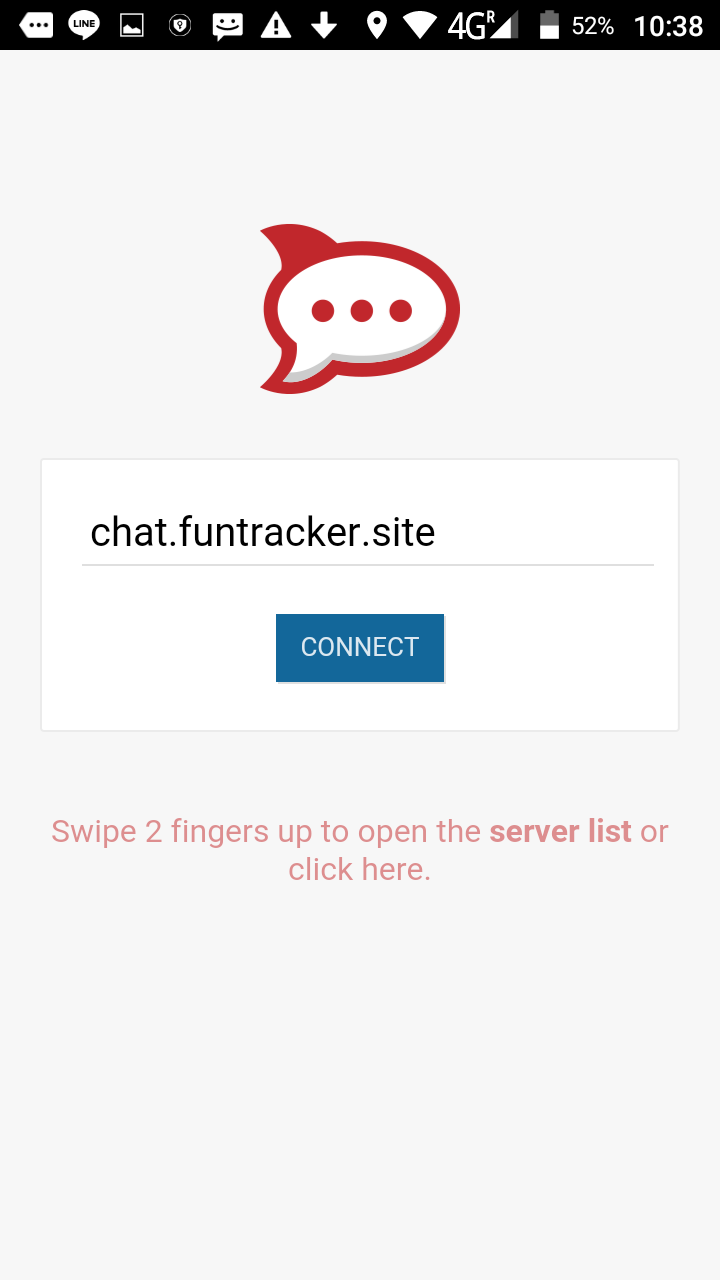 As seen in the image fill in the website box with: chat.funtracker.site and hit the connect button. The next page you see should be:
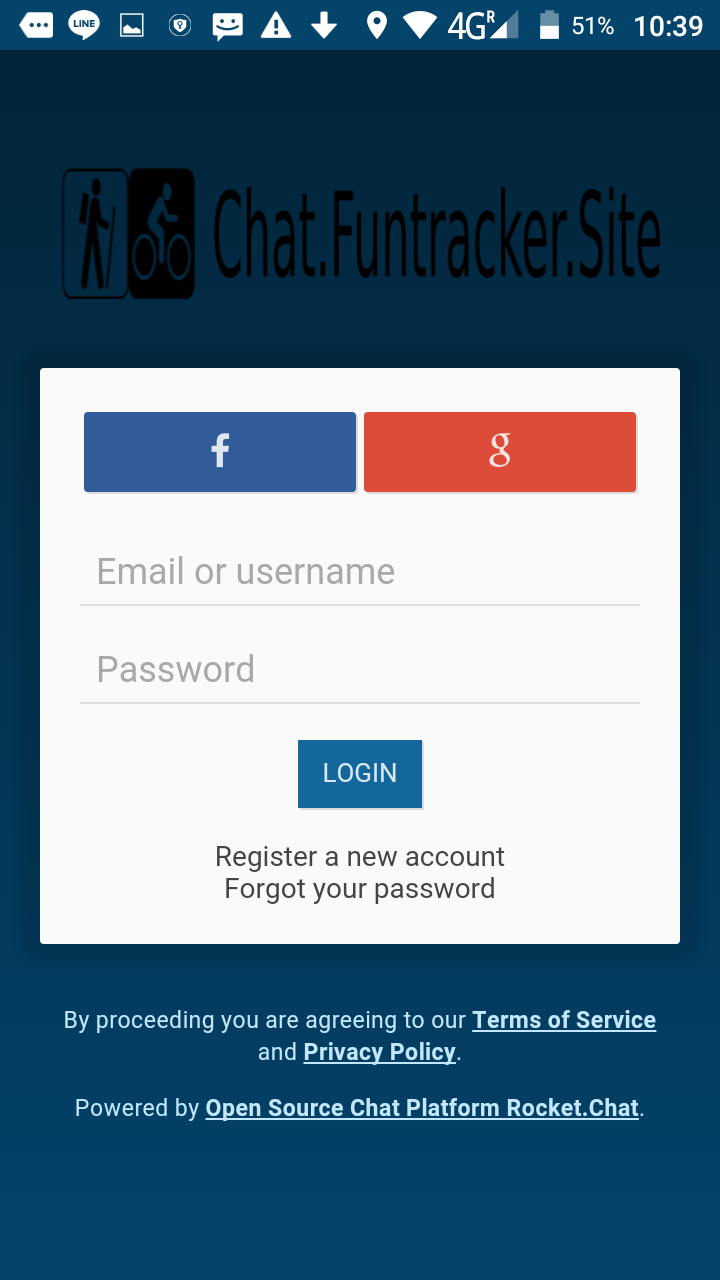 At this point you can select ether your already existing gmail.com or facebook.com accounts to use as authentication for chat. Optionaly you can select register and fill in a register form manually if you like.
Assuming you picked gmail.com as authentication you would see:
At this point you can select ether your already existing gmail.com or facebook.com accounts to use as authentication for chat. Optionaly you can select register and fill in a register form manually if you like.
Assuming you picked gmail.com as authentication you would see:
 Here you fill in your known gmail.com address and push next to see the next page:
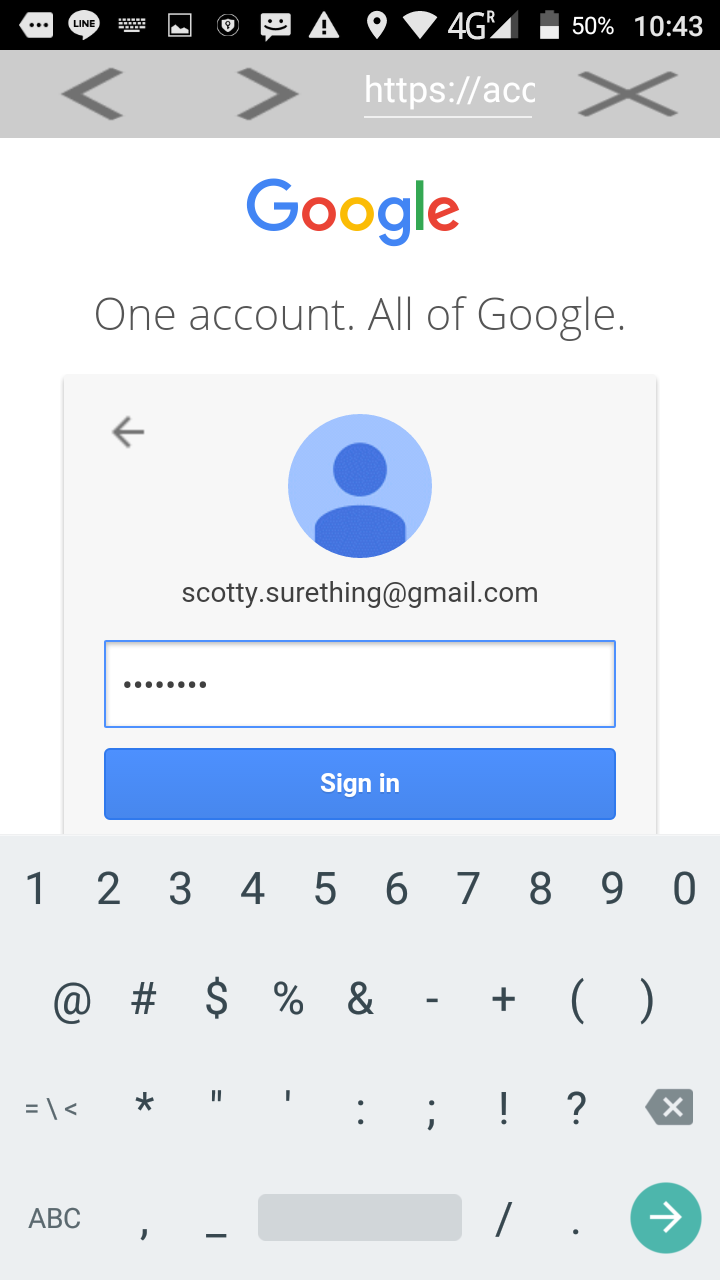 Here you fill in your password for your gmail.com account and hit Sign in button and your almost done.
next thing you should see is:
Here you fill in your password for your gmail.com account and hit Sign in button and your almost done.
next thing you should see is:
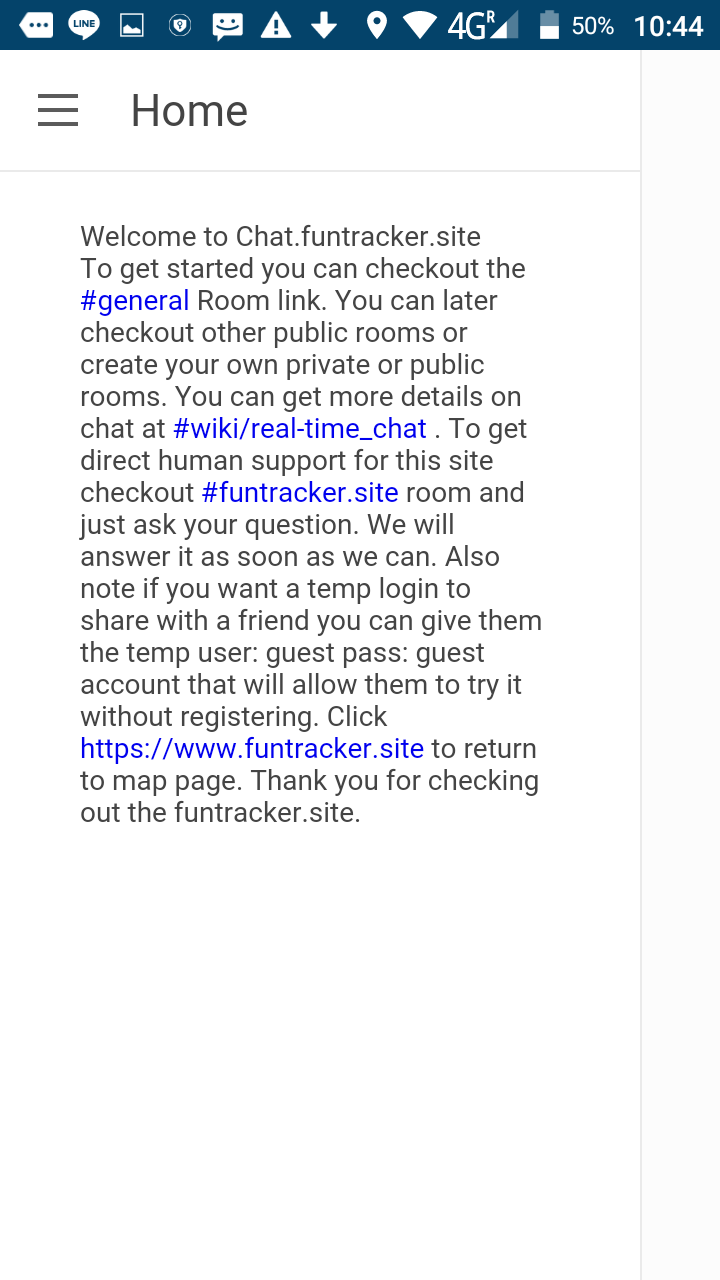 At this point you can hit the menu button on the top left corner to get into one of the already created rooms to chat in that will look something like this:
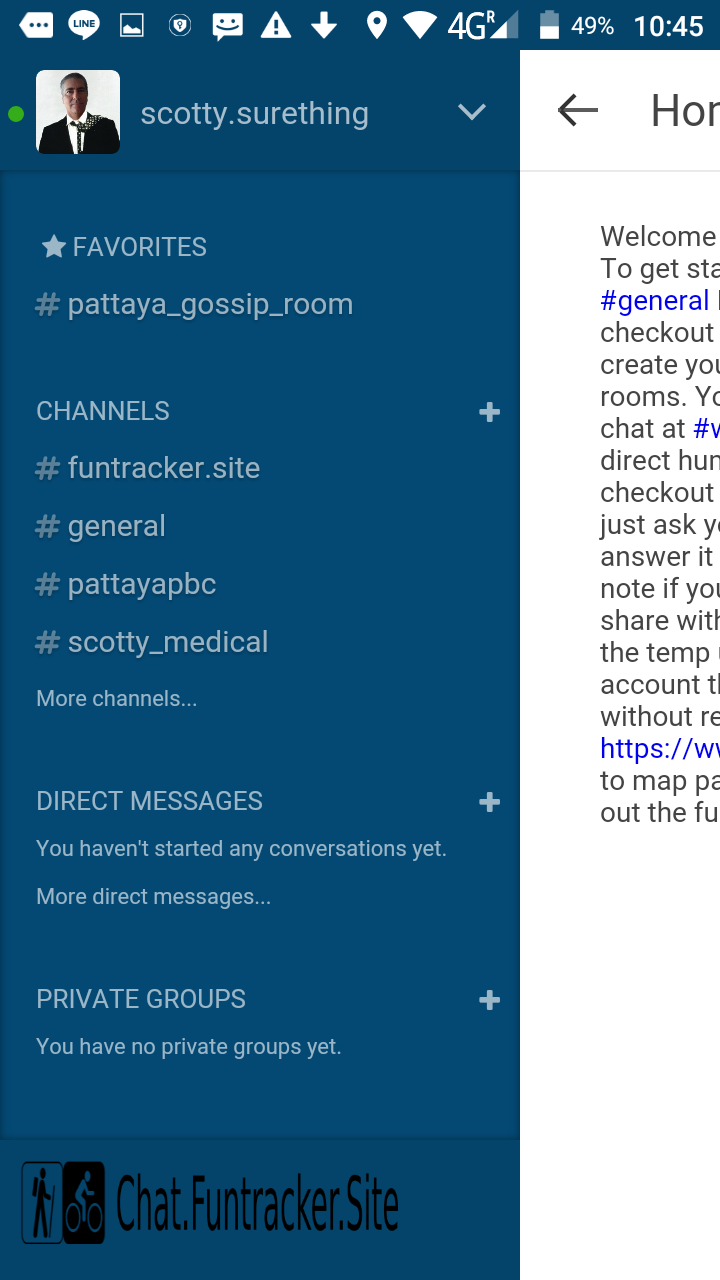 From this point you can try #funtracker.site to chat with us directly to get more human help or just start playing with it. Hope you like it. Have fun.
That's it!! what you think?
Ok that's all I have for now. as I add more features I will try to keep this up to date. But it's hard to program and document stuff at the same time. So sometimes it's just better to trail and error to see what changes we might have made on top of these features documented here. If you have any questions give us a chat at: https://chat.funtracker.site/channel/funtracker.site or respond with issues on https://github.com/sacarlson/Trick_Tracker . Thank You for your interest in funtracker.site and the development of Trick_Tracker software.
